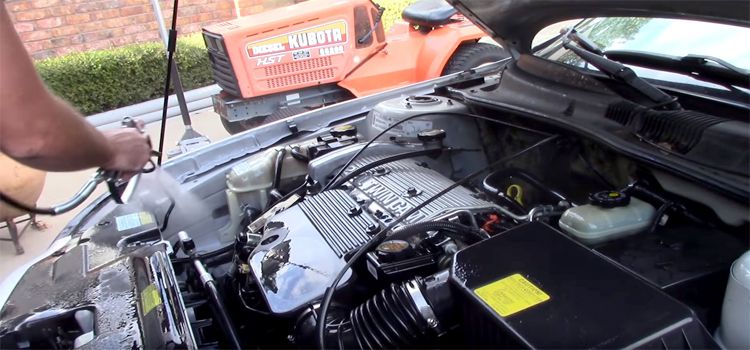
How to Clean Under the Hood of a Car: Shine Bright Like a Diamond!

Having a clean engine bay or a clean hood underneath is a real pleasure to the eyes. That’s not at all! Have you ever imagined how fresh you feel after a bath?
Well! It’s almost the same for a car. The dirt and dust do not go underneath the car, but they sure are a bother to the eyes. How to clean under the hood of a car?
There is no simple method for this noble task. You have to go through several steps to uncover your beautiful car from the hands of dirt.
No Worries! We’re here to back you up. Here, we have picked out the best method available. Then we crafted it into bite-size chunks.
So, without wasting any more time, let’s clean our way to awesomeness.
Is it Necessary to Clean Under the Hood?
Simply saying, It depends but you should.
Do you love fixing your own car? Do you want to remove dust from your vehicle?
If yes, then you must. I bet you won’t like handling a dirty engine bay.
Now, do you like to boast about your car? Or are you a fan of car aesthetics?
If yes, then you should never keep your engine bay dirty. If possible, then clean under the hood of your car on a regular basis.
Besides these reasons, with a clean engine bay, leak detection and other troubleshooting activities become easier.
Now that you know why it is necessary to clean under the hood, we can proceed to the next part.
Stage 1: The Car Preparation Stage
Before you start cleaning, there are some items that you need to gather, Moreover, there are some parts that you need to move away from the cleaning arena.
So, follow these steps to prepare your car for cleaning under the hood.
Cooldown the Engine
No matter how tough the material is, temperature variations can damage it. So, if you put water immediately after stopping your engine, there is a high chance that you might cause it harm.
The engine wires and pipes are infamous for leaking under this condition. Sometimes these parts break down at the touch of water while being heated.
So, cool down your engine. Do some Covering!
Not all parts of the engine are able to handle water. Not even in a cooled-down stage. To protect, you need to cover up these parts with plastic bags. So, the cover-up:
- Engine air intake
- The engine alternator
- Any electronics, wires, relays, and sensors
- The distributor cap (If water gets underneath it somehow then your last hope is WD-40. If this doesn’t work, then you’ll have to replace it)
- Any part that you might have a doubt on
Cover these parts and you’ll be safe.
Take the Filters Out and Remove the Battery Cable
Some parts are not safe enough under plastic wrappings or cannot be wrapped in plastics. So, it’s time you removed those.
First, take out the air filters. Both the air intake filter and cabin air filter need to be taken out.
While taking these out remember to cover the intakes with plastics.
Now while removing the battery cables, you’ll need to be extra cautious. Here are some tips for removing the battery cables-
- Only use the appropriate size sockets to loosen the cable nuts.
- Be cautious about the positive cable. If it touches any part of the car, then a short might incur.
At this point, your car is ready for cleaning.
Stage 2: Gathering Equipment
Now that your car is ready, it’s time that you get prepared. So, don’t keep your car waiting and gather these kinds of stuff-
- Car washing soap with cannon (Get a polymer one or a non-wax one)
- Engine Cleaner and Degreaser
- Microfiber cleaning cloths
- Low-pressure sprayer
- Rubber seal protectant
- Vinyl protector
- Body protectors like Hand safety gloves and Eye protection goggles
Order these materials and start with the cleaning process.
Stage 3: The Actual Cleaning Process
Now that you and your car are ready, you can begin with the cleaning. So, here are the steps for cleaning your car from all that dirt
Step 1: Degrease
Before you start putting in water, you should de-grease your engine parts.
So, start spraying the degreaser.
There is a myth that degreasers shouldn’t be applied to hoses and fluid containers. That’s not true. You can go on with it.
Lastly, let the degreaser sit for around 10 minutes.
Step 2: Rinse the Engine
Now, it’s time to wash off the degreaser.
Be careful. Only use low-pressure water. Also, don’t flood your engine compartment.
Step 3: Wipe with Soap and Water
Now that you’ve rinsed the engine, it’s time you be gentler.
So, start wiping your car with soapy water. Through the wiping, you’ll be able to remove the dirt, degreaser, and grime of the engine bay.
Here are a few things that you need to consider before the wiping-
- Wipe with a microfiber cloth
- Don’t use any soap. Use only the recommended ones
- Dilute it properly
- Look out for remaining debris
Step 4: Spray Again and Dry off
After the wiping, you have to spray or rinse the whole area again. Follow the previous method this time too.
After the spraying dries off the engine bay with microfiber towels. DO NOT use any type of air-dry method!
Stage 4: Unpacking and Restoring
Now that you’re finished with the cleaning and drying, it’s time to restore your car.
So, take down all the plastic wrappings and restore the parts that were taken off. Do this part with delicate care.
To get more information about how to clean under the hood of a car!
If necessary, then watch this YouTube video to execute this step perfectly!
Final words
You already know that cleaning under the hood of a car is necessary. If you decide to do that, follow this method.
But don’t forget to be careful in every step. A slight mistake might damage parts of your car and you might need to replace them.
However, you’ll feel tremendous joy when you’ll look at the engine bay after cleaning.


You’re right. Cleaning the car engine is necessary for keeping the car running in good condition, preventing mechanical and electronic problems, and prolonging the car’s life. But if there is n’ t your article, I won’t don’t know how to do it. Thanks a lot.